Talking Serial to Bluz
This tutorial will walk you through accessing the Serial UART port on bluz. While each bluz board has a built-in UART, there is no USB connector or native support for plugging it into your USB connector on a PC. Therefore, you must convert from the TX/RX pins to USB if you wish to use the UART for viewing output on your PC.
For this tutorial, you will need:
- One bluz DK
- One power source (battery shield, battery, USB line, etc.)
- One of the following:
Using an FTDI breakout is the simplest as the hardware is designed to convert UART to USB. However, if one isn't available, a Photon/Core (or really any 3.3V microcontroller with a USB Serial port) can be used as they contain the proper hardware.
In most Arduino sketches and examples, Serial is used to send output directly to the USB port. On bluz, however, there is no built-in Serial port so Serial is not used. Serial1 needs to be used, which refers to the TX/RX pins. This is to keep compatibility and proper naming convention with most Arduino boards and clones.
UART Shield
The bluz UART shield comes with its own FTDI breakout and compatible shield. More details can be found in the hardware reference.
FTDI Breakout
NOTE: Please ensure that your breakout is running at 3.3V and not 5V, some boards have the option of running either through setting jumpers or other means, so please make sure you are running in 3.3V mode or you can damage bluz.
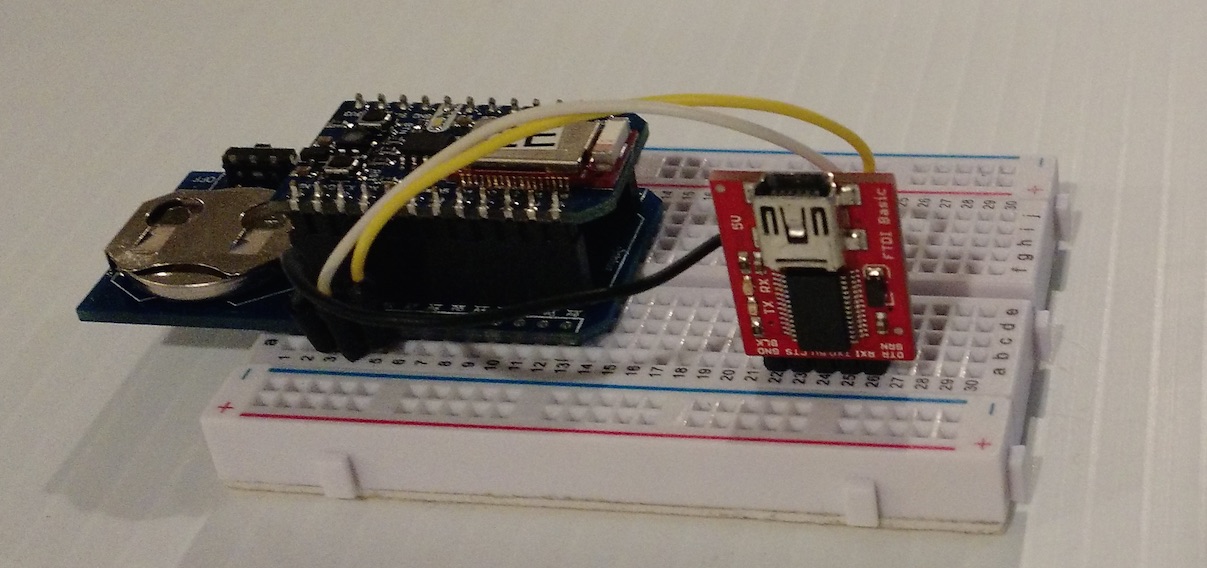
- Place bluz in a breadboard with the power supply attached (in this case, a battery shield)
- Place the FTDI breakout in the breadboard
- Hook GND of the FTDI breakout to GND of bluz
- Hook TX of the FTDI breakout to RX of bluz
- Hook RX of the FTDI breakout to TX of bluz
- OPTIONAL: Hook 3.3V of the FTDI breakout to 3V3 of bluz (this is only necessary if you don't have a power supply and your FTDI breakout can provide 3.3V)
- Follow the instructions for installing drivers for your FTDI breakout board via their documentation
- In your bluz sketch, include the .begin() line in your setup() function, then use Serial.println or other commands from the Serial Reference to output values:
// SYNTAX
Serial1.begin(38400);
Serial1.println("Hello World");
Photon
Using a Photon/Core to convert UART to USB is perfectly valid if you don't have an FTDI breakout board. You must connect the two together and load a simple sketch onto the Photon to relay Serial through to the PC.
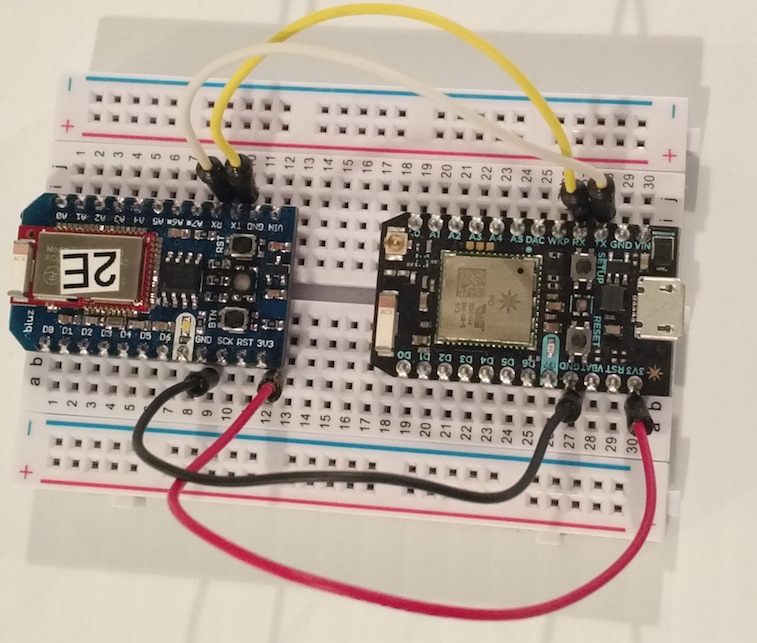
- Place bluz in a breadboard, in this case with not power supply as we will use the Photon to power bluz
- Place the Photon in the breadboard
- Hook GND of the Photon breakout to GND of bluz
- Hook TX of the Photon breakout to RX of bluz
- Hook RX of the Photon breakout to TX of bluz
- Hook 3V3 of the Photon to 3V3 ox bluz
- Load the sketch at the bottom of this page onto the Photon (adjust bit rates if necessary)
- Install the driver for the Photon if using Windows, or setup your Mac or Linux machine to work with the Photon over USB per these instructions
- Power on the Photon and allow it to connect to the cloud
- Connect to the Photon through a terminal application, such as CoolTerm or Hyperterminal
- Power on bluz and you should see the Serial output
// bluz serial transverter
void setup() {
    Serial.begin(38400);
    Serial1.begin(38400);
    Serial.println("Welcome to the bluz serial transverter!");
}

void loop() {
    while (Serial.available() > 0) {
        Serial1.write(Serial.read());
    }
    while (Serial1.available() > 0) {
        Serial.write(Serial1.read());
    }
}