Building Custom Products with bluz
This tutorial will explain how to build custom products with bluz.
If you want to incorporate bluz into your product, you have two choices. The first is to include the bluz board itself in your design, either by using sockets or soldering the board directly. This can be advantageous if you want to keep the major parts of bluz, such as the RGB LED and buttons, and want to minimize your design.
The other option is to include only the necessary parts of bluz into your design. The two main pieces that are required are the MDBT40 module and the external SPI flash. There are also a number of components required to support those two pieces.
MDBT40
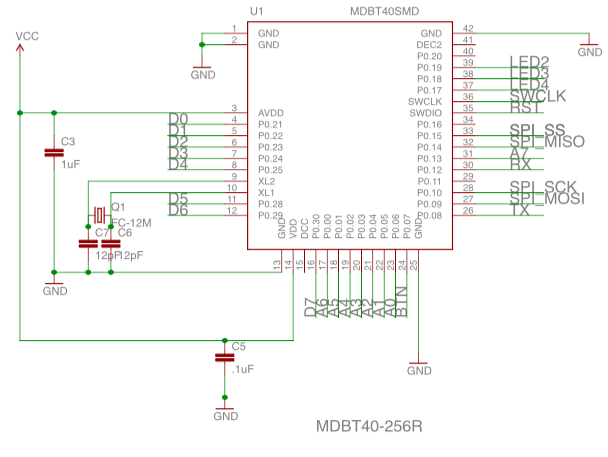
The MDBT40 contains the nrf51822, antenna, and many necessary components for the device to run. The module only needs the following components as well to operate:
- A 0.1 uF capacitor between VCC and GND as close to the VDD pin as possible
- A filter circuit for the ADC reference voltage on the AVDD pin (NOTE: We use a simple 1uF capacitor, but this can be changed)
- A 32.768kHz crystal. While this isn't absolutely required, it is highly recommended. For more information, please see the nrf51822 datasheet.
- Capacitors for the 32.768kHz crystal
The MDBT40 module should receive regulated 3.3V to the VCC pin, this can be provided by many kinds of regulators.
External SPI Flash
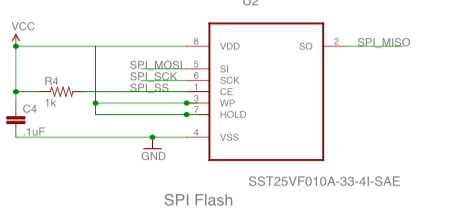
Bluz uses external SPI flash to store system flags, backup firmware, and OTA updates. We use the SST25 series from STMicro. This series has multiple options with multiple different capacities available. Bluz uses the 2Mbit (256KByte) version, but higher capacity versions can be swapped in if extra flash is required for your application.
SWD Interface
The nrf51822 in bluz uses a two-pin version of JTAG called Single Wire Debug, or SWD. This can be used to completely erase and reprogram the nrf51, which is required on the manufacturing line for testing, programming and provisioning. You should break out the SWCLK and SWDIO pins and leave them accessible. You should also break out the VCC and GND pins as they are required for the programmer.
UART Peripheral
While not fully required, it is also recomended to break out the TX/RX pins so they are accessible. The bluz provisioning and programming scripts can use these pins for feedback during programming on the manufacturing line. If they are not proeset, it will not be possible to fully automate the programming/provisioning process, so it is highly recomnded to leave them exposed and available for quick connection.
Optional Components
All other components, such as the buttons, LDO, and RGB LED are optional.
Provisioning
Once your hardware is built, it will need to be provisioned for the Particle cloud. This process creates and device ID, adds it to the Particle database along with the public key, and the flashes the board with the latest bluz DK firmware. You can use the bluz Command Line Interface to program your devices. This process requires an API Key, which needs to be obtained from bluz. You can contact us at hello@bluz.io to request a key and purchase credits for programming boards.